سلام و درود خدمت همه دوستان و اساتید فتوشاپ
من یه سایت خارجی پیدا کردم که خوداموزهای بسیار زیبا و دقیقی داره فقط تو هر خود اموز یکی تا دو تا مشکل کوچیک برام پیش میاد که باعث میشه نتونم کار رو تموم کنم چون خیلی مبتدی هستم این پست رو باز کردم تا بتونم اون مشکلات کوچیک رو ازتون بپرسم سعی کردم از نسبتا اسوناش شروع کنم ممنون میشم بهم کمک کنید...
ادرس خوداموز اول:
http://www.photoshopessentials.com/photo-effects/blur-streaks/
من تا گام 8 رو براحتی انجام میدم تا گام هشت این عکس بدست میاد
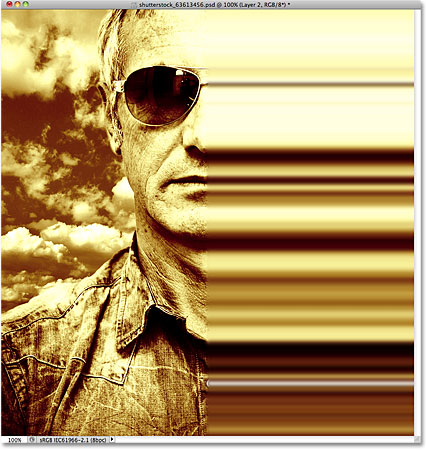
اما تو گام نه می مونم
گام 9 هم به این شرحه

Select the Brush Tool.
Make sure the layer mask thumbnail is selected in the Layers panel (you should see a thin white highlight border around it which tells us it’s selected. Click on the thumbnail to select it if it’s not highlighted). Set your Foreground color to black by first pressing the letter D on your keyboard, which resets them to their default colors (white for the Foreground and black for the Background), then press the letter X to swap them, making black the Foreground color. You can see your current Foreground and Background colors by looking at the two color swatches near the bottom of the Tools panel:

The Foreground color (left color swatch) is now set the black.
Then, with a medium or large, soft-edge brush, simply paint over sections of the color streaks to hide them and reveal the main photo underneath. You can change the size of your brush as you paint by pressing the left bracket key ( [ ) on your keyboard to make it smaller or the right bracket key ( ] ) to make it larger. Holding down your Shift key while pressing the left bracket key will make the brush edges softer. Holding Shift and pressing the right bracket key makes the edges harder, although you’ll want to use a soft-edge brush to create smooth transitions between the color streaks and the main image.
Here, I’m painting with a large, soft-edge brush to reveal part of the man’s face behind the streaks:
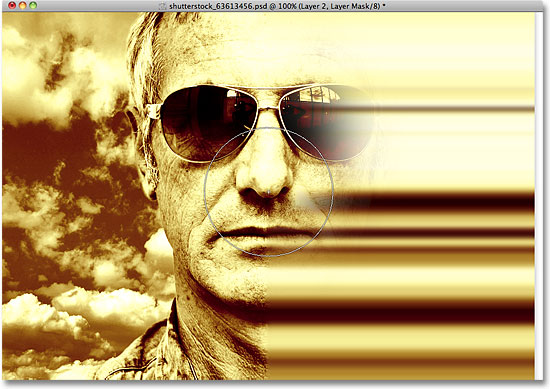
Painting with black on a layer mask hides the areas you paint over.
If you make a mistake and reveal too much of the main image, simply press X on your keyboard to swap your Foreground and Background colors, which sets your Foreground color to white. Paint over the problem area with white to bring back the color streaks, then press X to swap the colors again and continue painting with black.
You can also change the opacity of your brush to create even more subtle transitions between the color streaks and the main image. Simply press a number on your keyboard to change the brush opacity. For example, to set the opacity to 50%, press the number 5. For something like 25%, press 2 5 quickly. To set the brush opacity back to the full 100%, press 0 (remember to set it back to 100% when you’re done to avoid possible confusion the next time you use the Brush Tool):

Paint over the same area repeatedly with a lower brush opacity to build up the transition effect.
I’ll continue painting over the color streaks using different brush sizes and opacity settings, using the X key on my keyboard to swap between black and white for my brush color as needed. Here is my final result:
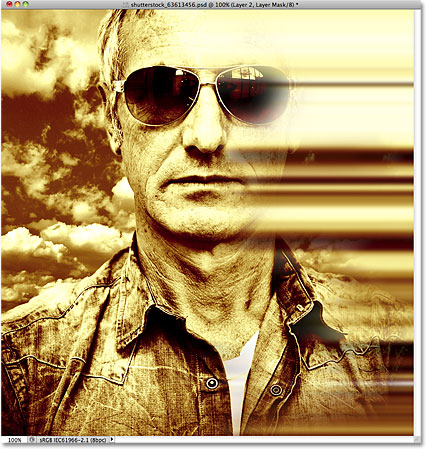
من همه گام های بالا رو موبمو انجام میدم ولی اصلا نمیتونم اینشکلی درش بیارم لطفا کمک کنید بدونم دقیقا گام 9 به بعد چیه که اشتباه انجام میدم مرسی
من یه سایت خارجی پیدا کردم که خوداموزهای بسیار زیبا و دقیقی داره فقط تو هر خود اموز یکی تا دو تا مشکل کوچیک برام پیش میاد که باعث میشه نتونم کار رو تموم کنم چون خیلی مبتدی هستم این پست رو باز کردم تا بتونم اون مشکلات کوچیک رو ازتون بپرسم سعی کردم از نسبتا اسوناش شروع کنم ممنون میشم بهم کمک کنید...
ادرس خوداموز اول:
http://www.photoshopessentials.com/photo-effects/blur-streaks/
من تا گام 8 رو براحتی انجام میدم تا گام هشت این عکس بدست میاد

اما تو گام نه می مونم
گام 9 هم به این شرحه
Grab the Brush Tool from the Tools panel:

Select the Brush Tool.
Make sure the layer mask thumbnail is selected in the Layers panel (you should see a thin white highlight border around it which tells us it’s selected. Click on the thumbnail to select it if it’s not highlighted). Set your Foreground color to black by first pressing the letter D on your keyboard, which resets them to their default colors (white for the Foreground and black for the Background), then press the letter X to swap them, making black the Foreground color. You can see your current Foreground and Background colors by looking at the two color swatches near the bottom of the Tools panel:

The Foreground color (left color swatch) is now set the black.
Then, with a medium or large, soft-edge brush, simply paint over sections of the color streaks to hide them and reveal the main photo underneath. You can change the size of your brush as you paint by pressing the left bracket key ( [ ) on your keyboard to make it smaller or the right bracket key ( ] ) to make it larger. Holding down your Shift key while pressing the left bracket key will make the brush edges softer. Holding Shift and pressing the right bracket key makes the edges harder, although you’ll want to use a soft-edge brush to create smooth transitions between the color streaks and the main image.
Here, I’m painting with a large, soft-edge brush to reveal part of the man’s face behind the streaks:

Painting with black on a layer mask hides the areas you paint over.
If you make a mistake and reveal too much of the main image, simply press X on your keyboard to swap your Foreground and Background colors, which sets your Foreground color to white. Paint over the problem area with white to bring back the color streaks, then press X to swap the colors again and continue painting with black.
You can also change the opacity of your brush to create even more subtle transitions between the color streaks and the main image. Simply press a number on your keyboard to change the brush opacity. For example, to set the opacity to 50%, press the number 5. For something like 25%, press 2 5 quickly. To set the brush opacity back to the full 100%, press 0 (remember to set it back to 100% when you’re done to avoid possible confusion the next time you use the Brush Tool

Paint over the same area repeatedly with a lower brush opacity to build up the transition effect.
I’ll continue painting over the color streaks using different brush sizes and opacity settings, using the X key on my keyboard to swap between black and white for my brush color as needed. Here is my final result:

من همه گام های بالا رو موبمو انجام میدم ولی اصلا نمیتونم اینشکلی درش بیارم لطفا کمک کنید بدونم دقیقا گام 9 به بعد چیه که اشتباه انجام میدم مرسی

