Final Result Preview
Part 1: Create Glass Material
Step 1:
Open
Render Setting dialog. In Assign Renderer rollout click on
Production button and choose
Vray from list. Here the version of Vray is not important.
Step 2:
Open
Material Editor. Click on
Get Material button and double click on
VRayMtl in Material/Map browser. Change the name of this material to
Glass_ref.
Step 3:
Change the parameters of Glass_ref material:
- Reflect color = White (R=255 , G=255 , B=255)
- Fresnel reflections = On
- Reflection Subdivs = 10
- Reflection Max Depth = 12
- Refract color = White (R=255 , G=255 , B=255)
- IOR = 1.55
- Refraction Subdivs = 10
- Refraction Max Depth = 12
- Fog Color = Light Gray (R=240 , G=240 , B=240)
- Fog Multiplier = 0.5
Finally in Options rollout check Reflect on back side
As this material is fully transparent we do not need to change Diffuse color however even if you change it, it will not have any affect in final renders.
Fresnel option is check to
Fresnel Physic law and let it simulate reflection naturally. if you do not check Fresnel option, then you need to change your Reflect color to a very light gray.
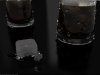
Max depth by default is set to 5 for both reflection and refraction. This number determines how many times the light ray can be reflected or refracted. I have sliced my glass
vertically to show you how Max depth works. As you can see a ray is reflecting four times because glass object has four layers.
If Max depth be less than 4, then our final result will be very opaque. So to determine Max depth always need to see our scene reflective and refractive surfaces. For this model I chose
12 because later I want to have caustic effect which will take more energy of light. In the below picture I render Glass object once with
Max depth of
12 and another time I changed it to
5. You can obviously see how glass object lost detail with Max depth of 3. Pay attention to the rendering time that it didn't increase much.
I didn't want to change the Glass color but I wanted to make attenuation of light as it passes through the object. So I give
Fog Color a very light gray to let thicker areas become darker than thinner areas.
Under
Fog color, you have
Fog Multiplier. This field will let you to control the strength of the Fog color. Smaller values reduce the effect of the fog color; let more lights pass through and making the material more transparent. Larger values increase this effect and making the material more opaque. In below picture I have show you the final result with different Fog multiplier values.
Because my object has transparent material and I want it cast transparent shadow, I need to turn On Affect Shadows option. This option only works with V-Ray shadows and lights.
But in my tutorial I didn't turn Affect shadows option On. The reason is because later I want to apply caustic effect. In Vray when you Turn on caustic effect, Affect shadows will automatically turn off. In fact Affect shadows is just a fake caustic effect.
The last option that I active it is Reflect on back side. When this option is On, reflection for back faces of object also will calculate. This affect includes internal reflections too. in Below picture I have shown the difference in result when Reflect on back is On and Off. as you can see when this option is On, increase the realism but also it take longer time for rendering.
Part 2: Preparing the Scene
Step 4:
Create a
Plane in Top view. It should be under Glass object.
Step 5:
Apply the
Bend modifier and bend it
85 degrees to let have a background behind the glass.
Step 6:
The result in corner of plane is not smooth. you can increase the
Plane segments or apply
MeshSmooth. In this tutorial I applied
MeshSmooth.
Step 7:
Open
Material Editor. Select another empty slot. Click on
Get Material button and double click on
VRayMtl in
Material/
Map browser. Change the name of this material to
Ground. You do not need change anything in here and just apply to the
Plane object.
Step 8:
I have used a
standard Target Direct light for lighting my scene. First create it in the scene and then with
Move tools, position it in a right place same as below picture. You may need to change your position, render and again change to find the best position. It is important to focus on the Glass object.
Step 9:
Change your
light parameters same as below picture.
Part 4: Render Setup
Step 10:
Open
Render Setting dialog. Under
V-Ray tab and on
V-Ray Global Switches rollout turn
off Default Lights option. It is the first thing in your render setting that almost in all scene you need to do.
Step 11:
Choose
Adaptive subdivision as
Image sampler and leave its setting as
default. For
Antialiasing filter you can choose
Mitchell-Netravali.
Step 12:
For
environment I use a
HDR image. You need to go to
material editor. Select another empty slot in Material Editor. Click on
Get Material button and double click on
VRayHDRI map in
Material/
Map browser.
Step 13:
On
VRayHDRI map settings click on
Browse button and choose a
HDR image. Because the strength of HDRI is very high I reduce it to
0.5 in Overall mult and Render mult. Also change its
type to
Spherical environment.
Step 14:
Back to
Render Setup dialog. On
V-Ray Environment rollout turn
on GI Environment Skylight and Reflection/refraction environment. Then instance the
HDRI map from Material editor to these two slots.
Step 15:
Finally on V-Ray Indirect illumination (GI) rollout turn on GI. I will the GI settings as default.
Keep in mind that caustic effect creates by photons and it is separate from GI. So whatever you On or Off GI, it will just affect on your scene light and will not touch caustic effect. In the below picture you can see two render image with and without GI.
Part 5: Caustics Settings
Step 16:
On the
Render Setup dialog, under
Indirect Illumination tab, turn
on Caustics. From now your caustic effect is active.
Step 17:
Let's have a look at VRay Caustics parameters.
Multiplier: This controls intensity of caustic effect. This is global means if you increase or decrease it will affect all your lights. I suggest to leave it
1 which is default value and just change your light multiplier value if you need change caustic effect intensity.
Search dist: When Vray emits photons at a given surface point, it searches for number of photons on that surface. The radius of this circular area defines by Seach dist field.
Smaller values produce sharper and noisier caustics. On the other hand, larger values produce smoother and blurrier caustics.
Max photons: this will use number of photons for interpolation. Smaller values produce sharper and noisier caustics. On the contrary, larger values produce smoother and blurrier caustics. If you change Max photon value to 0, V-Ray automatically will use all the photons that it can find inside the search distance area.
Step 18:
The last way to increase your caustic effect is increasing your light caustic subdivs.
Right click on your
light and choose
V-ray Properties from
quad menu. V-Ray light properties will be open. On the left side you can choose your light source. On the right side if you uncheck Generate caustics, it will not be able to create caustic effect. On the Caustic Subdivs field you can increase the number of photons that emitted by the light source. Increasing this value will highly increase your render time.
Looking the below picture and see how increasing Caustic subdivs will increase quality and render time.
Final Results: