majidsoftware
New Member
متن ها خوب ترجمه نشدن چون با سایت گوگل ترجمه شدن بازم از هیچی بهتره

مرحله اول :
 Show romanization
باز تصویرگر ، و با استفاده از ابزار قلم (میانبر : فسفر) دو قرعه کشی های مختلف خطوط منحنی ، سعی کنید آنها را در هر مقطع دیگر مثل آنهایی زیر وارد نمایید. آن خواهد بود که شکل دود ما است. پس از آن ، آیا چیزی مشابه به همین دوباره و رسم دو خط. از آنهایی هستند که از دو جفت خط ، یکی را انتخاب جفت ، و مجموعه ای از رنگ سکته مغزی سفید خط اول و دیگری با رنگ خاکستری تیره (70 ٪). تکرار چیزی مشابه به همین در این جفت ارز دیگر خطوط رنگ اما برعکس شود. دلیل ما این کار را بدین خاطر است که هنگامی که ما وارد آن اشکال در فتوشاپ ما قادر به نیشگون گرفتن و کشیدن رنگ با سهولت بسیار بیشتری.
مرحله اول :
باز تصویرگر ، و با استفاده از ابزار قلم (میانبر : فسفر) دو قرعه کشی های مختلف خطوط منحنی ، سعی کنید آنها را در هر مقطع دیگر مثل آنهایی زیر وارد نمایید. آن خواهد بود که شکل دود ما است. پس از آن ، آیا چیزی مشابه به همین دوباره و رسم دو خط. از آنهایی هستند که از دو جفت خط ، یکی را انتخاب جفت ، و مجموعه ای از رنگ سکته مغزی سفید خط اول و دیگری با رنگ خاکستری تیره (70 ٪). تکرار چیزی مشابه به همین در این جفت ارز دیگر خطوط رنگ اما برعکس شود. دلیل ما این کار را بدین خاطر است که هنگامی که ما وارد آن اشکال در فتوشاپ ما قادر به نیشگون گرفتن و کشیدن رنگ با سهولت بسیار بیشتری.
Open Illustrator, and using the Pen Tool (shortcut: P), draw two different curved lines, try to make them cross each other like the ones below. Those will be the shape of our smoke. After that, do the same thing again and draw two more lines. From those two pairs of lines, select one pair, and set the stroke color of the first line white and the other with dark gray(70%). Repeat the same thing on the other pair of lines but invert the colors. The reason we do this is because when we import those shapes in Photoshop we will be able to tweak the colors with a lot more ease.
مرحله دوم:
با استفاده از ابزار ترکیب ، بر روی لبه خط سفید و سپس بر روی لبه خط خاکستری. آن یک خط بین دو خط ایجاد کنید. با استفاده از ابزار انتخاب مخلوط ، به شیء> ترکیبی> گزینه ها مخلوط. ، تغییر وجود دارد. فاصلهگذاری به مراحل مشخص می شود و 200 قدم. تکرار همان روند در این جفت ارز دیگر از خطوط ما داشته باشد.
با استفاده از ابزار ترکیب ، بر روی لبه خط سفید و سپس بر روی لبه خط خاکستری. آن یک خط بین دو خط ایجاد کنید. با استفاده از ابزار انتخاب مخلوط ، به شیء> ترکیبی> گزینه ها مخلوط. ، تغییر وجود دارد. فاصلهگذاری به مراحل مشخص می شود و 200 قدم. تکرار همان روند در این جفت ارز دیگر از خطوط ما داشته باشد.
Using the Blend Tool, click on the edge of the white line and then click on the edge of the gray line. It will create a line between the two lines. With the Blend Tool selected, go to Object>Blend>Blend Options. There, change the Spacing to Specified Steps and put 200 steps. Repeat the same procedure on the other pair of lines we have.
مرحله سوم:
در حال حاضر îtâ € ™ ثانیه تمام فتوشاپ را از اینجا. کپی مخلوط خمیر اول و آن را در فتوشاپ به عنوان یک شیء هوشمند. تکرار کنید که برای لایه دوم. ما را انتخاب کنید تا به عنوان کالا هوشمند رب دلیل این که شما می توانید مقیاس و دوباره در مقیاس بدون از دست دادن کیفیت. این علت رخ میدهد که بردارها آنها باقی بماند به جای تبدیل شدن کارت فعلی. علاوه بر این که ما می توانیم بردار دوباره ویرایش ، و اگر شما در حال استفاده از نسخه CS3 îtâ € ™ ثانیه ممکن است به اعمال فیلتر در تمام حالت های غیر مخرب نیز هست. این بدان معناست که اگر شما درخواست هر گونه فیلتر شما قادر به تغییر پارامترهای خود را در هر زمان و یا حتی حذف اثر فیلتر بازگشت به تصویر اصلی. این لایه به سبک بی شباهت نیست به جز در حال حاضر با فیلترهای.
در حال حاضر îtâ € ™ ثانیه تمام فتوشاپ را از اینجا. کپی مخلوط خمیر اول و آن را در فتوشاپ به عنوان یک شیء هوشمند. تکرار کنید که برای لایه دوم. ما را انتخاب کنید تا به عنوان کالا هوشمند رب دلیل این که شما می توانید مقیاس و دوباره در مقیاس بدون از دست دادن کیفیت. این علت رخ میدهد که بردارها آنها باقی بماند به جای تبدیل شدن کارت فعلی. علاوه بر این که ما می توانیم بردار دوباره ویرایش ، و اگر شما در حال استفاده از نسخه CS3 îtâ € ™ ثانیه ممکن است به اعمال فیلتر در تمام حالت های غیر مخرب نیز هست. این بدان معناست که اگر شما درخواست هر گونه فیلتر شما قادر به تغییر پارامترهای خود را در هر زمان و یا حتی حذف اثر فیلتر بازگشت به تصویر اصلی. این لایه به سبک بی شباهت نیست به جز در حال حاضر با فیلترهای.
Now it’s all Photoshop from here. Copy the first blend and paste it in to Photoshop as a Smart Object. Repeat that for the second layer. We choose to paste as Smart Objects because you can scale and re-scale without losing quality. This happens because they remain vectors rather than becoming bitmap graphics. Besides that we can edit the vectors again, and if you are using the CS3 version it’s possible to apply all filters in a non-destructive mode as well. That means if you apply any filter you will be able to change their parameters anytime or even delete the filter effect returning to the original image. This is not dissimilar to Layer Styles except now with filters.
مرحله چهارم:
Show romanization
در اینجا من فقط من با استفاده از لایه های پوشه ها سازماندهی. تنظیم حالت ترکیب برای افزایش برای هر دو پوشه : شکل 1 و 2. پس از آن درخواست محو گاوسی با شعاع 1 پیکسل در هر دو لایه : دود 1 و 2.
مرحله چهارم:
در اینجا من فقط من با استفاده از لایه های پوشه ها سازماندهی. تنظیم حالت ترکیب برای افزایش برای هر دو پوشه : شکل 1 و 2. پس از آن درخواست محو گاوسی با شعاع 1 پیکسل در هر دو لایه : دود 1 و 2.
Here I just organize my layers using folders. Set the blending mode to Multiply for both folders: Shape 1 and 2. After that apply a Gaussian Blur with a radius of 1 pixels in both layers: Smoke 1 and 2.
مرحله پنجم:
تکراری هر دو لایه در داخل هر پوشه. بنابراین از شما 1 دود ، دود کپی 1 ، 2 دود ، دود و 2 کپی داشته باشند. تغییر حالت از ترکیب دود 1 کپی و دود 2 کپی کنید به جایگذاشت
تکراری هر دو لایه در داخل هر پوشه. بنابراین از شما 1 دود ، دود کپی 1 ، 2 دود ، دود و 2 کپی داشته باشند. تغییر حالت از ترکیب دود 1 کپی و دود 2 کپی کنید به جایگذاشت
Duplicate both layers inside of each folder. So you will have Smoke 1, Smoke 1 Copy, Smoke 2, and Smoke 2 Copy. Change the Blending mode of the Smoke 1 Copy and Smoke 2 Copy to Overlay

مرحله ششم:
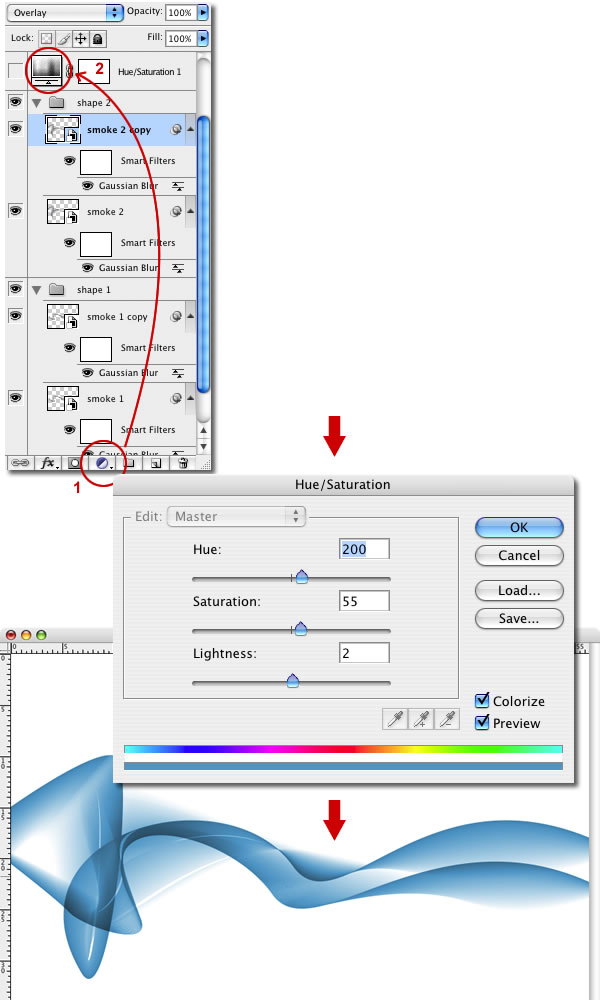
حالا ما می رویم به تغییر رنگ مایل به خاکستری که از آن تن به یک blueish با ایجاد یک لایه جدید یا پر کردن و انتخاب تنظیم رنگ / اشباع. قرار دهد که به لایه در بالا از دیگران و دوبار کلیک بر روی لایه خود را برای ویرایش رنگ / پارامترهای اشباع.
حالا ما می رویم به تغییر رنگ مایل به خاکستری که از آن تن به یک blueish با ایجاد یک لایه جدید یا پر کردن و انتخاب تنظیم رنگ / اشباع. قرار دهد که به لایه در بالا از دیگران و دوبار کلیک بر روی لایه خود را برای ویرایش رنگ / پارامترهای اشباع.
Now we are going to change the color from that grayish tone to a blueish one by creating a new fill or adjustment layer and choosing Hue/Saturation. Put that layer on top of the others and double-click on the layer to edit the Hue/Saturation parameters.
مرحله هفتم:
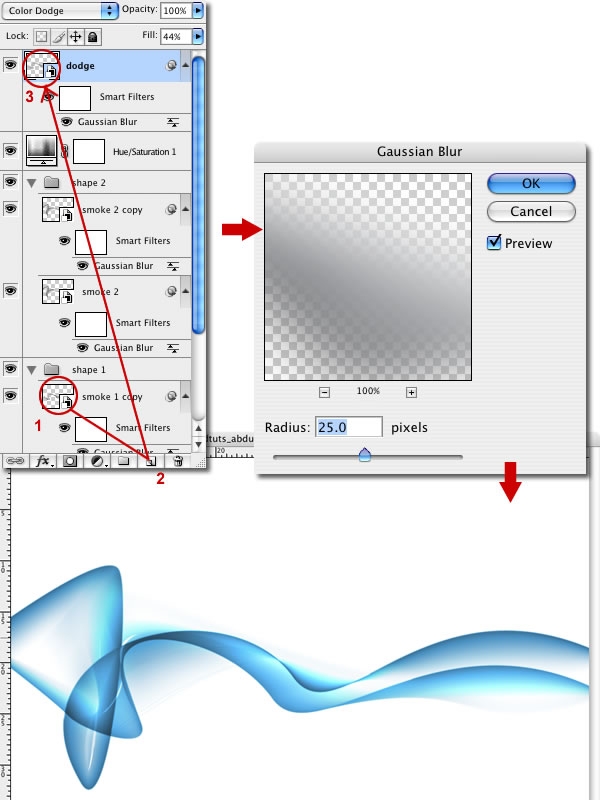
تکراری دود 1 لایه و Rasterize ایجاد آن بنویسید. سپس آن را در بالای لایه دیگر قرار دهید ، حتی بالاتر از لایه تنظیم. پس از آن تغییر ترکیب آن را به حالت رنگ داج و درخواست محو گاوسی با شعاع 25 پیکسل. شما یک رنگ آبی روشن مانند تب و تاب بودن دریافت کنید.
مرحله هفتم:
تکراری دود 1 لایه و Rasterize ایجاد آن بنویسید. سپس آن را در بالای لایه دیگر قرار دهید ، حتی بالاتر از لایه تنظیم. پس از آن تغییر ترکیب آن را به حالت رنگ داج و درخواست محو گاوسی با شعاع 25 پیکسل. شما یک رنگ آبی روشن مانند تب و تاب بودن دریافت کنید.
Duplicate the Smoke 1 layer and Rasterize it. Then put it on the top of the other layer, even above the adjustment layer. After that change its blending mode to Color Dodge and apply a Gaussian Blur with the radius of 25 pixels. You will get a light blue color like a glow.
مرحله هشتم:
Show romanization
حالا داریم اصول. ما در اینجا توقف می تواند داشته باشد و در حال حاضر اثر بزرگ ، اما بیایید آن را به سطح بعدی. وقت آن است که اضافه کردن بعضی از wafts فوق العاده است. اول کم رنگ شدن دود 1 بازگشت به حدود 50 درصد بنابراین کمی نرمتر. سپس دود گروه 1 و تکراری محو شدن حق بازگشت به 20 ٪. انتخاب گروه و اضافه کردن لایه ماسک. سپس با استفاده از سفید به سیاه شیب شعاعی ، ماسک آن را به عنوان آن را به سمت راست میشود تا از دود محو کردن را به هیچ چیز.
حالا داریم اصول. ما در اینجا توقف می تواند داشته باشد و در حال حاضر اثر بزرگ ، اما بیایید آن را به سطح بعدی. وقت آن است که اضافه کردن بعضی از wafts فوق العاده است. اول کم رنگ شدن دود 1 بازگشت به حدود 50 درصد بنابراین کمی نرمتر. سپس دود گروه 1 و تکراری محو شدن حق بازگشت به 20 ٪. انتخاب گروه و اضافه کردن لایه ماسک. سپس با استفاده از سفید به سیاه شیب شعاعی ، ماسک آن را به عنوان آن را به سمت راست میشود تا از دود محو کردن را به هیچ چیز.
Now we have the basics. We could stop here and have a great effect already, but let's take it to the next level. It's time to add some extra wafts. First fade Smoke 1 back to about 50% so it's a little softer. Then duplicate the Smoke 1 group and fade right back to 20%. Select the group and add a Layer mask. Then using a White to Black radial gradient, mask it out as it gets to the right side so the smoke is fading off into nothing.
مرحله نهم:
Show romanization
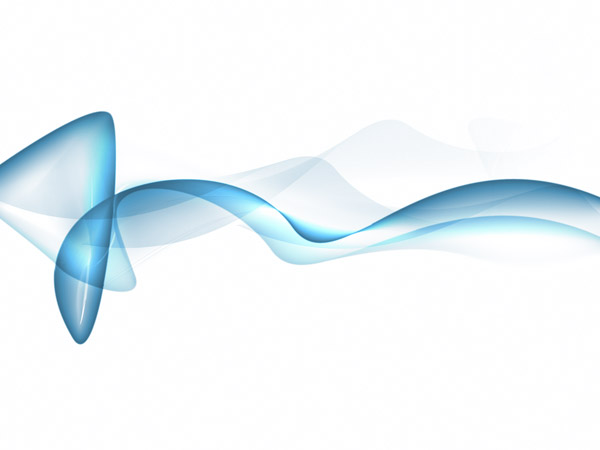
بعدی تکراری محو کردن همان لایه دود که ما در آخرین مرحله ساخته شده و باعث چرخش آن را به بیت آن را در ادامه نگاه تصادفی. اگر شما زمان حال شما می توانید از این لایه های از مراحل بسیار شروع به تکثیر در تصویرگر. هدف شما باید این باشد که از دود wafts رفتن به دور از دود کانال اصلی. اگر شما می خواهید در اثر دود سفید ، در اینجا شما باید متوقف شود.
بعدی تکراری محو کردن همان لایه دود که ما در آخرین مرحله ساخته شده و باعث چرخش آن را به بیت آن را در ادامه نگاه تصادفی. اگر شما زمان حال شما می توانید از این لایه های از مراحل بسیار شروع به تکثیر در تصویرگر. هدف شما باید این باشد که از دود wafts رفتن به دور از دود کانال اصلی. اگر شما می خواهید در اثر دود سفید ، در اینجا شما باید متوقف شود.
Next duplicate the same fading out smoke layer we made in the last step and rotate it to make it look a bit more random. If you had time you could replicate these layers from the very beginning steps in Illustrator. Your aim should be to have wafts of smoke going away from the main smoke channel. If you want a smoke on white effect, you should stop here.

مرحله دهم:
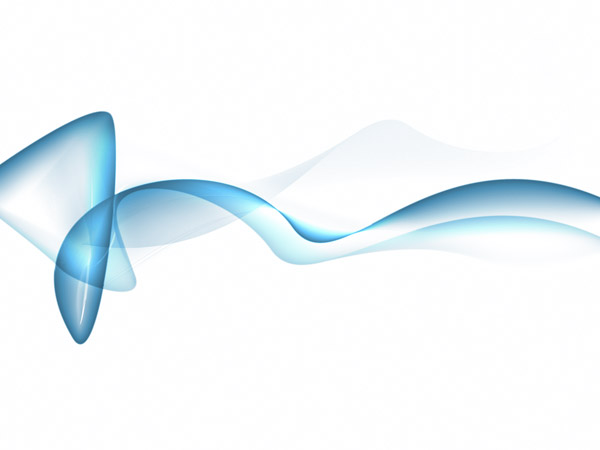
بعد یک لایه جدید ایجاد بیش از همه دیگران را پر کنید و آن را با رفتن از سطح شیب دار سفید (# FFFFFF) را به رنگ آبی خاکستری ish (# C4CCD0) به عنوان نشان داده شده.
Next create a new layer above all the others and fill it with a gradient going from white (#FFFFFF) to grey-ish blue (#C4CCD0) as shown.
بعد یک لایه جدید ایجاد بیش از همه دیگران را پر کنید و آن را با رفتن از سطح شیب دار سفید (# FFFFFF) را به رنگ آبی خاکستری ish (# C4CCD0) به عنوان نشان داده شده.
Next create a new layer above all the others and fill it with a gradient going from white (#FFFFFF) to grey-ish blue (#C4CCD0) as shown.
مرحله یازدهم:
Show romanization
ترکیب لایه جدید را به حالت طرد تنظیم. طرد (و همچنین تفاوت) معکوس کردن رنگ ها از لایه های پایین تر ، به ما میدهد که در اثر خاکستری تیره دود.
ترکیب لایه جدید را به حالت طرد تنظیم. طرد (و همچنین تفاوت) معکوس کردن رنگ ها از لایه های پایین تر ، به ما میدهد که در اثر خاکستری تیره دود.
Set the new layer's blending mode to Exclusion. Exclusion (as well as Difference) invert colors from lower layers, which gives us a smoke on dark-grey effect.
مرحله دوازدهم:
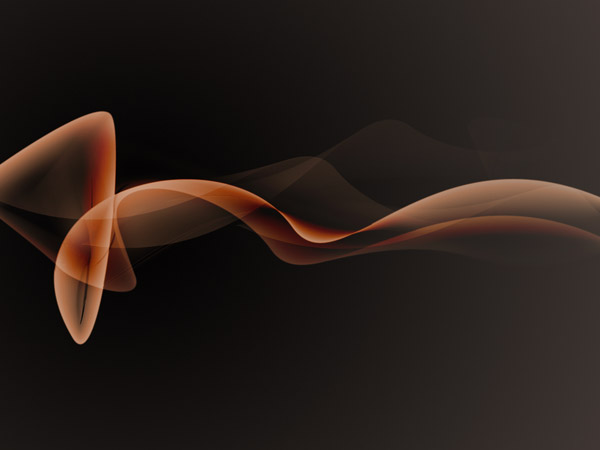
رنگ آمیزی در حال حاضر خیلی داغ ، اما می تواند حتی بیشتر مطبوع. ایجاد یک لایه ی جدید بالای دیگران و پر کردن آن با شیب خطی از : # 5f4547 به # 7096e4 به عنوان نشان داده شده. هنگامی که شما شیب ، تنظیم به حالت ترکیب رنگ و 50 درصد تاری.
رنگ آمیزی در حال حاضر خیلی داغ ، اما می تواند حتی بیشتر مطبوع. ایجاد یک لایه ی جدید بالای دیگران و پر کردن آن با شیب خطی از : # 5f4547 به # 7096e4 به عنوان نشان داده شده. هنگامی که شما شیب ، تنظیم به حالت ترکیب رنگ و 50 درصد تاری.
The coloring is now pretty cool, but it could be even more graceful. Create a new layer above the others and fill it with a linear gradient from #5f4547 to #7096e4 as shown. Once you have the gradient, set the blending mode to Color and 50% Opacity.

مرحله سیزدهم:
بالاخره ما اضافه کردن یک بیت از متن را به پایان کردن با مزه. این اثر است بهترین وقتی که شما به آن ایجاد بزرگتر از شما را در پایان نیاز است ، سپس آن را منقبض کردن و اجرا Unsharp فیلتر ماسک را روی آن (فیلترهای> تیزکردن> Unsharp ماسک) برای بدست آوردن منحنی به دنبال پاک و ترد.
بالاخره ما اضافه کردن یک بیت از متن را به پایان کردن با مزه. این اثر است بهترین وقتی که شما به آن ایجاد بزرگتر از شما را در پایان نیاز است ، سپس آن را منقبض کردن و اجرا Unsharp فیلتر ماسک را روی آن (فیلترهای> تیزکردن> Unsharp ماسک) برای بدست آوردن منحنی به دنبال پاک و ترد.
Finally we add a bit of text to finish off the image. This effect is best when you create it larger than you need at the end, then shrink it down and run the Unsharp Mask filter over it (Filters > Sharpen > Unsharp Mask) to get the curves looking clean and crisp.
و نتیجه: